Earning my stripes
Back when I first found out I was expecting, the most common question I got was, "Is it a boy or a girl?"
Now that I'm ready to pop, the new most popular question is, "Do you have the nursery ready?"
Short answer is nope.
Long answer has a much more complicated explanation; which I will get to very soon. It involves our secret projects that have been happening around our house. I'll reveal them all soon. Pinkie swear.
So no, our nursery is not set up and no, it is not ready for a baby.
Here's my thing though.... the baby doesn't need its own room all perfectly set up when it comes home. We have a co-sleeper bassinet that will be in our room for the first few weeks, so the baby has a place to sleep and that will be just fine.
I did make some progress in that room, but I was hoping to show you the progress along with a perfectly set up room.
Well, that is clearly not happening, there is no perfect "after" to show you, so without further ado, lets talk about what has been done.
I painted the nursery!
Olympic No-VOC paint, which is pretty much made for pregnant ladies, was my go-to paint for this project.
Thanks for all the input on wall colors. We finally decided on Notre Dame (top left) & Cool Grey (bottom right).

These are Valspar paint swatches, but we got them color matched in Olympic no-VOC, and you can't tell any difference in color from the swatches.


I got a gallon in Notre Dame, since it was going on all 4 walls, and I got one quart in Cool grey since it was only going to be used on the stripe wall.
I painted all four walls in Notre Dame and it took two coats to cover fully and there were a few spots that needed a third coat to ensure all that ugly yellow was covered up. I did that one evening and had to let it completely dry before I started in on the stripes.
So a few days later, I started in on my long stripy journey. It is definitely a long process, but soooooo worth it.
First, I decided I wanted my stripes to be 8 inches tall. So I took the wall height (in inches) and divided it by 8 to determine how many stripes I would need. I did the math twice, because you know about me and my math skills.
I measured down from the ceiling every 8 inches and marked off where the stripes would be. I ended up with one "small stripe" that was only 2.5" wide at the very bottom of the wall, which is fine by me since it will be mostly covered by furniture.
I went and bought a laser level. This is absolutely key. I bought the cheapest one at Lowes ($15). It works by sticking it in the wall (with a small little nail) and then leveling it out and shooting the laser.

Then, the I followed the laser line with Frog Tape.
This step was more tricky than I anticipated. I tried to just unroll the tape in a long line, but I wasn't very good at keeping it level. So instead I started using smaller pieces of tape and piecing them together. It made it easier, but still not a walk in the park. It is a very long and tedious process.
The one thing I didn't think of was that I would need to flip the laser over to make sure I could tape off the whole wall. After my first stripe, I had it down, so I would put the laser in the middle of the wall and tape off the right side, then flip it over and tape the left side, then pull out the level and tape in between to fill the gap.


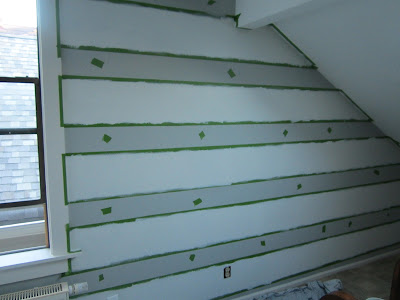
Once I had all the stripes taped, I also taped off the walls and moldings around them to ensure I didn't accidentally bleed paint onto them.
Then, since pregnancy brain is in full effect, I marked off with more tape, which stripes were to be painted and which were staying grey.
If I hadn't done this, I would have totally painted the wrong stripes!

Now I was ready to paint my stripes.
Sort of....
Sort of....
I was really worried about "bleeding" under the tape, and to ensure that I had extremely crisp and perfect stripes I "sealed" the tape to the wall by painting a thin coat of Notre Dame over the tape and the wall, sealing the tape to prevent bleeding.


Then I had to let that dry.
So a few days later, I finally got around to breaking out the Cool Grey paint and getting to the satisfying part.
I painted three coats of Cool Grey over the Notre Dame in relatively quick succession.
 I waited just about 20 minutes between coats, and then after my third coat was on (and still tacky) I carefully peeled the tape off.

I swear that is the trick to ensuring good paint lines; peel it off while its still a bit wet.
I got more and more excited with every tape line I pulled off. The change was so dramatic and so awesome I couldn't help but do a little happy dance.

For the rest of the night, I kept going in and out of the room just to look at the stripes.
I love them more than I could have imagined.
Love, love, love.
If it weren't so much work, I would do stripe walls all over!


Comments
Post a Comment